Welcome back to our second installment of “Tips from the Trenches”. This particular series comes to you from two Perkins Excel enthusiasts: Kat and Victoria. Over the next few months, we’ll share various tips and tricks in Excel that we’ve picked up while in the world of accounting. Today’s post covers Excel’s SUM function, which also happens to be the most commonly used function.
Let’s start with AutoSum
This is a quick and easy way to add a column or row of values without typing “Sum(“ for the millionth time. Excel provides a button on the ribbon, or you can use the keyboard shortcut Alt + =. AutoSum is used to automatically enter the Sum function to add a list of numbers. When you click the AutoSum button, Excel guesses the range of cells to be added based on where there are blank cells, but you can adjust the selection.
To start:
- 1) Select a blank cell, where you want the result to appear
- 2) Select “AutoSum” in the “Editing” group on the “Home” tab on the ribbon

- 3) The range of data Excel guesses that you want to be AutoSum-ed is displayed within the formula tab.
- 4) If the guess is correct, press Enter.
- 5) If the guess is incorrect, select the range of cells needed, and press Enter.
Moving on to Functions
Sometimes it’s not that simple though. Perhaps you want Excel to perform a function based on a condition; happily, Excel can do that using a logical expression or logic test. All functions with IF (SUMIF, COUNTIF, IF, etc.) require a logical test. You can use logical expressions to make your filter, conditional formatting, and data validation more specific and more powerful.
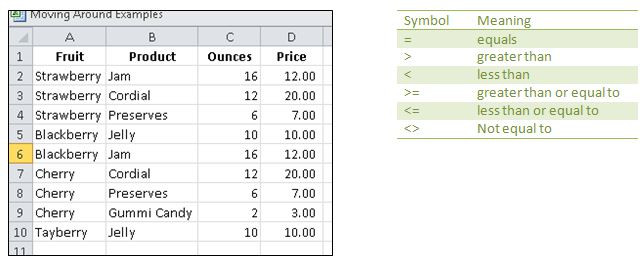
In Excel Logic, there are only two answers: TRUE and FALSE. When you’re crafting a logical expression or logical test, you need to figure out a way to describe what you want in these terms. For demonstration purposes, we’ve mocked up a sample table and provided some tools:
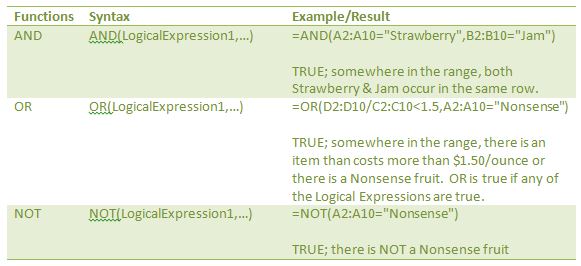
Here are the basic logical functions you’re likely to need:
Getting IF-fy
This is where Excel logic starts to get really exciting! You can begin using Excel logic to get Excel to do your work for you. There are all sorts of IF-driven functions in Excel, but let’s start with the mother of them all:
=IF(logical test, value if true, value if false)
This takes a logical test and then does something different depending on whether it is true or false. We use this a lot when we’re applying the IRS’s tangible property rules. (If you need a refresher, check out our bulletin about “…Unraveling the New “Repair” Regulations”)
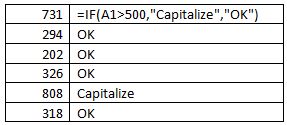
For the most part, all clients now have a written capitalization policy that has a threshold over which they need to capitalize items and under which they can expense items. If the client’s capitalization threshold is $500 and we’re looking at an expense account, then we use a formula like =IF(A1>500,”Capitalize”,”OK”).
This formula will look at the cell, and if the cell is greater than 500, it will return “Capitalize”, if the cell value is less than 500, it will return “OK”
Sometimes, there are more than two cases (because tax law is like that). In that scenario, you’re going to want to nest your IF statements. (But for this example we’ll spare you the tax law.)
Nesting works like this:
“I like Strawberry better than Blackberry or Cherry, but Tayberry best of all.” I want Excel to rank these products based on these preferences.
Before you start nesting, draw yourself a table with the hierarchy you’re trying to describe with your IF. If what you’re trying to describe doesn’t fit into a simple hierarchy, then IF is probably not the right tool.

IF(A2=”Tayberry”,”Fantastic”,The nested IF to copy down in Column E of the example above looks like this:
IF(A2=”Strawberry”,”Good stuff”,”Meh.”))
If I (Kat) actually loathe Cherry, I might alter my hierarchy to:
And my IF statement to:
IF(A2=”Tayberry”,”Fantastic”,
IF(A2=”Strawberry”,”Good stuff”,
IF(A2=”Blackberry”,”Meh.”,”Eww!”)))
If you’re trying to get any fancier than that (two or three nested IF statements) it’s probably time to find another answer, like a VLOOKUP (keep an eye out for our post about VLOOKUPs later in the series).
Other IF Functions you should know about:
SUMIF(range to check for true or false,
logical expression,
range to sum if true)
SUMIFS(range to sum if all logical expresions are true,
range to check for logical expression 1,
logical expression 1,
range to check for logical expression 2,
logical expression 2,
continued to as many logical expressions as you like)
The SUMIF function sums the values in a range that meet the criteria specified. For this example, in the below column that contains numbers, you only want to sum values larger than 7.
You would input the following formula: =SUMIF(A1:A11,”>7”). Excel would give you 97. If you want 7 to be included in your SUMIF, then you would input “>=7”, Excel will give you 104. COUNTIF, COUNTIFS, AVERAGEIF, AVERAGEIFS all work similarly to SUMIF and SUMIFS.
Bonus tip: If you find yourself with a complex spreadsheet, and an insignificant error somewhere is messing it up, you’ll also want to know about this:
IFERROR(value, value if error)
Making your “value if error” something innocuous, like a blank cell (a pair of empty quotation marks: “”) or a zero can save you endless headaches.
Thanks for joining us for this installment of Tips from the Trenches. We hope we’ve increased the sum of your knowledge!
This blog post is a summary and is not intended as tax or legal advice. You should consult with your tax advisor to obtain specific advice with respect to your fact pattern.


