Welcome to Tips from the Trenches! This is the first of our ongoing Excel tips series. We’re Victoria and Kat, two Excel enthusiasts from Perkins. We’re kicking off by taking you spelunking through a tab of the Ribbon you may not have fully explored—the View tab. It’s got some gems you may not have mined yet!
At Perkins, every desk has two 22” wide screen monitors, but even with that perk, we still sometimes struggle with getting Excel to show us exactly what we need to see. In this post, we’re going to tell you what we think you need to know in order to get your spreadsheets perfectly organized on your screen.
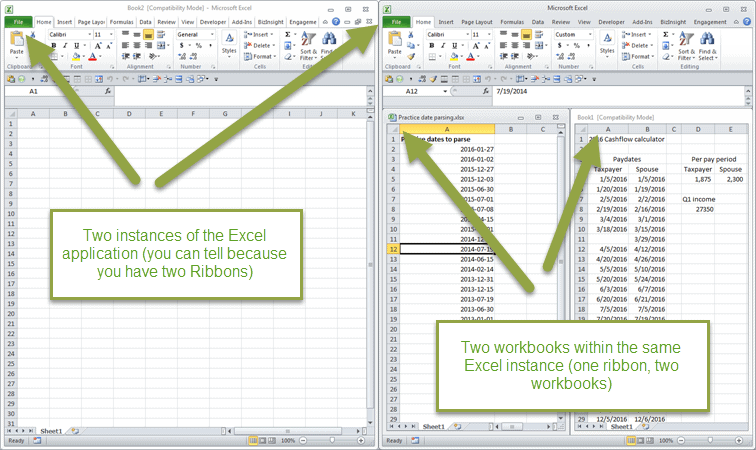
Your options for arranging Excel are different depending on whether you’ve got your spreadsheets open in the same instance of Excel vs. in separate application windows. Here’s how to tell if you have multiple instances:
And this is the View tab of the Ribbon:
New Window creates a second window of the active Excel workbook within your existing Excel instance. You’ll get two windows, one with “:1” and one with “:2” appended to the file name. (You can open as many windows as you like; they’re all editable, and they’ll stay a single workbook file.)
Having multiple windows of the same workbook within the same instance of Excel is super handy for:
- 1) Comparing data and formulas across worksheets within the workbook
- 2) Writing formulas that use cell references from multiple worksheets – you can write the formula in one window, and while you’re in the formula, click a cell reference from the second window just like you could if that cell was in the sheet where you are writing the formula.
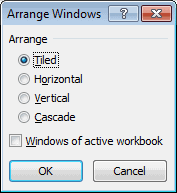
Arrange All affects all non-minimized windows in the active instance of Excel. It brings up a dialog box that is probably familiar:

- Tiled makes the windows roughly the same size and as square as possible.
- Horizontal makes all your windows the width of your Excel application window and as short as needed.
- Vertical makes all your windows the height of your Excel application window and as skinny as needed.
- Cascade – try it! Its best use (we’ve found) is for a scenario where you’ve ‘lost’ a window because you’re working in an Excel instance that is smaller than the Excel instance in which the file was last saved. In that situation (common with dual monitors), this is a lifesaver.
- The “Windows of active workbook” checkbox will take the Arrange All command of your choice and apply it only to the windows (created with New Window, above) of the active workbook, leaving all other workbooks and windows in their most recent sizing configuration.
View Side by Side allows you to look at two workbooks at the same time, sized according to your most recent “Arrange All” selection. Until you turn View Side by Side off, all Windows commands and shortcuts will affect only the two windows in the Side by Side session. For bonus points, you can also turn on Synchronous Scrolling, which lets you scroll the two workbooks together. The Synchronous Scrolling button on the Ribbon (just underneath View Side by Side) will stop being greyed out once you have View Side by Side turned on. Synchronous Scrolling is especially handy if you need to visually compare two versions of a spreadsheet.
Save Workspace creates a special kind of file that records the files you have open and their relative positions. If you’re doing a presentation or have a recurring task that involves opening multiple spreadsheets repeatedly, this can be a serious time-saver.
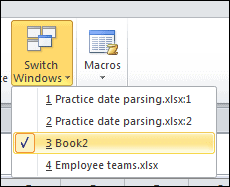
Switch Windows is a drop down menu that shows you the Excel workbooks open in the active instance of Excel.
That’s the “View tab” in a nutshell. Thanks for exploring it with us. We hope you’ve found something useful! We’ll be back next month with keyboard shortcuts that will save your life (or at least your wrists). You won’t want to miss it!
This blog post is a summary and is not intended as tax or legal advice. You should consult with your tax advisor to obtain specific advice with respect to your fact pattern.


